This article is last updated at 01.12.19
A lot of you know that Windows Virtual Desktop is now public preview. Lots of people wrote articles about it, and so did I. Most articles are covering information that is available everywhere, or just a subset of the service…
“If You Never Try, You’ll Never Know” – Ben Francia
With this article, I’d like to cover the things you might not have caught. Some are deep(er) technical points, while some are just not part of the public message but still way too important not to share. It’ll hopefully help you as consultant or architect to bring the technical (and functional) message around Windows Virtual Desktop to your customers  !
!
Continue reading…
Cloud learning
If you are learning on Azure right now and want to quickly increase your brains with awesome cloud-related knowledge? As part of Project Byte-Sized we are releasing a new community book – covering Cloud principles and best practices in June. After a period of 3 months, we received a total number of 145 submissions from all over the globe (19 countries). Altogether 140 people contributed resulting in 300+ pages, which we think is truly awesome. Download the (e)book here for free! It can help you gain knowledge from the best people in the community!
Table of Contents
Click on the title to jump to that spot in this article:
- The Desktop-As-a-Service market is growing
- What are the differences between traditional VDI and DaaS?
- Once more – What is Windows Virtual Desktop?
- RemoteApp (On Azure) is back
- The architecture behind it all
- WVD User connection Traffic Flow
- Migrate existing machines to Windows Virtual Desktop
- Windows 10 Multi User – Sizing templates
- Update management – update existing host pool
- Up and Downscale host pools – Breadth and Depth-first mode
- Microsoft Teams (and OneDrive) per-Machine now available
- Why using OneDrive Known Folder Move with WVD?
- New Azure Portal – Management Console
- Future Application Management – MSIX app attach
- Maintain your WVD images with Azure Update Management
- Windows Virtual Desktop and Azure Log Analytics
- Walkthrough Guidance: How to enroll Windows Virtual Desktop on Azure
- Pre-requisites for Windows Virtual Desktop
- Assign privileges to create the Tenant
- Create the Windows Virtual Desktop tenant
- Request the registration information token
- Assign Desktops to your users
- Enroll the Windows 10 Multi-User + Office 365 ProPlus master image
- Finalize the Windows 10 image
- Enroll your Windows Virtual Desktop Host Pool
- Assign RemoteApps to your users
- Install the Windows Virtual Desktop Agent
- Use the HTML5 WebAccess portal
The Desktop-As-a-Service market is growing
Garner and IDC expect a potential growth of 50% in the year 2019 of new DaaS customer choosing it over traditional VDI, pushing DaaS over 3 billion in revenue by the end of this year.
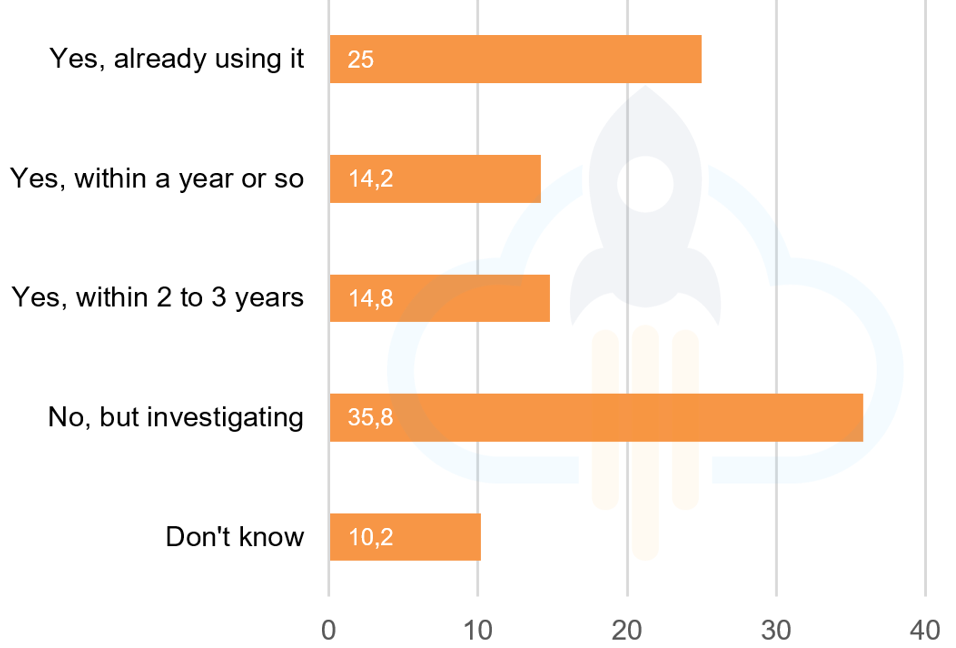
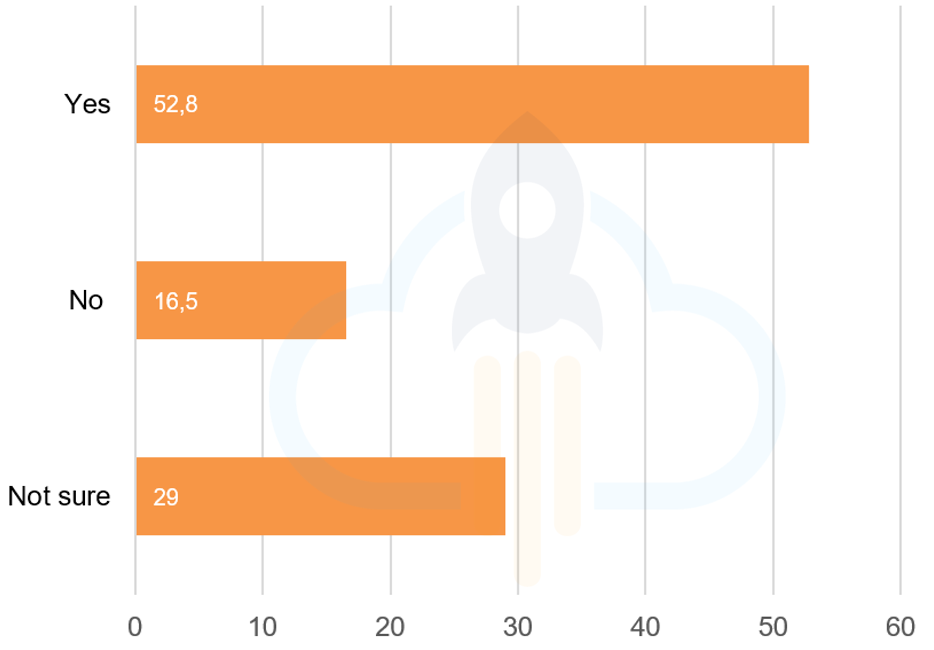
The EUC/VDI community acknowledged this number. During our relatively small Byte-Sized Community survey, we asked almost 200 independent people if they already use Desktop-As-a-Service solutions and if they expect that Windows Virtual Desktop will have a major impact on DaaS going forward.
“Q1 – Are you considering Desktop-As-a-Service (DaaS) anytime soon?”
“Q2 – Once released, the Microsoft Windows Virtual Desktop #WVD will have a major impact on DaaS going forward“
What are the differences between traditional VDI and DaaS?
To help you understand how Desktop-As-a-Service (DaaS) and traditional VDI are different from each other, I’ve had made this comparison matrix:

Once more – What is Windows Virtual Desktop?
People that follow my blogs know that I explained the services and benefits earlier in this article. However, for the people who didn’t catch that yet, here is a short run-over.
“Windows Virtual Desktop, or WVD in short – is a born in the cloud Desktop-As-a-Service platform service offering on top of the Microsoft Azure Cloud. All the infrastructure services, such as brokering, web access, load-balancing, management and monitoring is all setup for you as part of the control plane offering. It also gives you access to the new Windows 10 Multi-User (EVD) Operating System – which is completely optimized for the sake of Office 365 ProPlus services, such as Outlook, OneDrive Files on Demand (per-machine), Teams etc.“
The only responsibility in terms of management effort is the golden images on top of Azure Infrastructure-As-a-Service (IaaS). The rest is all managed for you through the Azure service SLAs. Sounds pretty cool, right?
Let’s first start with the things you might not know about it
For the people who lived offline the past 2 months, here are some things you must know before you start reading this article!
- Windows Virtual Desktop gives you the only multi-user Windows 10 experience, including compatibility with Microsoft Store and existing Windows line-of-business apps, while delivering cost advantages.
- Allows you to virtualize both Full desktops and RemoteApps.
- You can also use to for persistent Windows 10 – single user virtual desktops.
- WVD will support Windows 7 virtual desktops and is the only way you can safely run Windows 7 after its End of Life on 14 January 2020. Windows 7 desktops on WVD will be the ONLY systems that receive free extended security updates.
- Customers with the following license SKUs are entitled to use WVD with no additional charge apart from Azure compute, storage, and network usage billing:
- To run Windows 10 multi-session, Windows 10, or Windows 7
- Microsoft 365 F1, E3, E5, A3, A5, Business
- Windows 10 Enterprise E3, E5
- Windows 10 Education A3, A5
- Windows 10 VDA per user
- To run Windows Server 2012 R2, 2016, 2019
- Remote Desktop Services (RDS) Client Access License (CAL) with active Software Assurance (SA)
- To run Windows 10 multi-session, Windows 10, or Windows 7
- Windows Virtual Desktop session host VMs are not exposed to the internet directly. They can run using a private IP address and run isolated from other workloads or even the internet. The reverse connect technology allows the VMs to be accessed
- When a user connects to the WVD service, the use of Azure Active Directory (AAD) as the identity provider allows you to leverage additional security controls like multifactor authentication (MFA) or conditional access;
- Deeply integrated with the security and management of Microsoft 365, such as Intune Modern Management
- From a best practices point of view; Make sure all Azure resources are in the same region
- All the Nvidia vGPU graphical enhanced n-series virtual machines on Azure are supported with Windows Virtual Desktop as well!
- Citrix is adding their own Citrix Cloud stack as well to Windows Virtual Desktop, think about the Workspace experience and other services.
- Expect updates around this during Synergy later this month!
RemoteApp (On Azure) is back
Azure RemoteApp was a great technology, but due to some problems it never took off and Microsoft decided to deprecate the service. Citrix Essentials was the replacement for certain use-cases in Azure IaaS as part of the Microsoft + Citrix increased partnership to emphasize the digital transformation to the Cloud.
Now, RemoteApp will be back in terms of functionality. The code is rewritten, and lessons learned from the past are used to improve the product. In case you were wondering about Windows 10 Multi-User, the answer is yes – you can use it with a RemoteApp solution.
One of the most interesting use-cases is consolidating your Win32 apps in Azure and place icons on the endpoint’s desktop – start menu and/or tiles in the start screen! The user doesn’t see/know whether the app is locally installed or is running a RemoteApp in Azure. I personally think that this use-case will be very important for future Windows Virtual Desktop customers!
See below how fast and easy it works in conjunction with FSLogix/Microsoft Profile Containers as Profile Management solution!
The architecture behind it all
The first step that you must do is the create the master image, or golden image in Citrix terms. Most often, this will be based on the new Windows 10 Enterprise for Virtual Desktops (Multi-User) Operating System, which is now available from the Azure Marketplace. After enrolling the server, you can start installing the application on the machine. When you’re done, you must capture the machine as an image to use as a base for your Windows Virtual Desktop deployment.
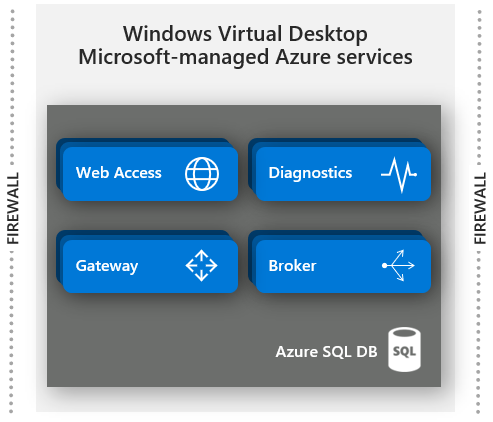
The Microsoft-managed control-plane is a completely redesigned infrastructure which leverages native Azure platform services to scale automatically. Think about Azure traffic manager for managing the RDP connection, Azure App Services in Azure for hosting the infrastructure services, and Azure SQL DB for hosting the RDS Brokering databases. Leveraging these services is the main reasons why this service is so cost-effective, which is the purpose of the Cloud and what it’s built for!
WVD User connection Traffic Flow
To give you a better understanding of how Windows Virtual Desktop connections work, I’m sharing the traffic flow. This is also useful for troubleshooting purposes.
Connecting from your endpoint to your Host Pool (session hosts in Azure Infrastructure-As-a-Service) works differently with Windows Virtual Desktop. It uses Reverse Connect, which means that no inbound ports need to be opened on the VM to setup the RDP connection.
Once the connection flow proceeds, bidirectional communication between your session hosts/host pool will go over port https (443). This port is almost always open from the inside to the outside, so it’s perfect for a remote connection to Windows Virtual Desktop!
See below in more depth how the traffic flow works.
- User launches RD client which connects to Azure AD, user signs in, and Azure AD returns token
- RD client presents token to Web Access, Broker queries DB to determine resources authorized for user
- User selects resource, RD client connects to Gateway
- Broker orchestrates connection from host agent to Gateway
RDP traffic now flows between RD client and session host VM over connections 3 and 4
Note: Windows Virtual Desktop can be used as worldwide service depending on your location and the location of the VMs. The control-plane persists currently in the US – east US 2 to be specific, however, your host pool can exist everywhere. Just remember your performance using a host pool outside of the US might vary until the control plane is added to other regions. If you set up a host pool in a non-US location with the US control plane, you will automatically switch to the local control plane when it’s rolled out for your region.

Migrate existing machines to Windows Virtual Desktop
Migrating from your current Remote Desktop Solution – RDS environment to Windows Virtual Desktop is relatively easy. You could use Azure Site recovery to migrate your server infrastructure to Azure. Follow the next 5 steps after that and sessions can be launched via Windows Virtual Desktop.
Note: There are also ARM Templates available to automate the creation of the RDS Infrastructure components.
- Register / create host pool within Windows Virtual Desktop
- Install RD Agent on session host
- Agent registers with Windows Virtual Desktop
- Decommission your old environment
- Ready to launch your session!
As part of this article, I’m showing al the manual steps of deploying a custom Windows 10 Multi-User (EVD) image in Azure and connect them to the Broker. This is the same procedure that you’ve to follow when you are using an existing image prior to preparation for the usage as part of Windows Virtual Desktop. The steps are starting here.

Windows 10 Multi-User – Sizing templates
Having the best end-user experience for your users is probably one of the most important goals when using Desktop-As-a-Service. Though the cloud takes over a lot of management tasks after migration, you’ll still need to handle image management. The following matrix gives a good baseline on how your Windows 10 Enterprise for Virtual Desktops (CVAD) must be sized for 4 types of users. The amount of data in your profile is depending on your settings, think about Outlook retention slider settings for example. Due to the support of OneDrive Files On-Demand, the storage allocation for files sync should be minimal.
The Windows Virtual Desktop Host Pool enrollment of the Azure Marketplace also advises your which Virtual Machine SKU in Azure fits best for the number of users you need/going to use.
See all the information on Virtual Machine sizing here.
Knowledge user
Knowledge users use lightweight productivity applications like Microsoft Word, Excel, Outlook, and the Microsoft Edge browser.
For knowledge users, we recommend no more than four users per virtual CPU (vCPU).
Professional user
Professional users use internet browsers and productivity applications in addition to supporting more intensive workloads like developing software and creating multimedia content.
For professional users, we recommend no more than two users per vCPU.
Power user
Power users use engineering and graphics applications like computer-aided design (CAD) and Adobe Photoshop. GPUs are often a good choice for users who regularly use graphics-intensive programs for video rendering, 3D design, and simulations.
For power users, we recommend no more than one user per vCPU.
To learn more about graphics acceleration, check out Choose your graphics rendering technology.
Azure has other graphics acceleration deployment options and multiple available GPU VM sizes. Learn about these at GPU optimized virtual machines sizes.
Update management – update existing host pool
The Microsoft WVD team created Azure ARM templates that remove or stop the old (drain mode) instance of WVD Hostpool session hosts and creates new virtual machines and registers them as session hosts to WVD host pool.
Extra information around the Azure ARM .json template can be found here. Or click on the Deploy to Azure button below to directly inject the .json ARM template in your Azure environment.
Note: All these features will later be integrated into the Azure Portal, as part of the new Windows Virtual Desktop management console. Get a sneak preview here.

There are different sets of parameters you must enter to successfully deploy the template:
- ActionOnPreviousVirtualMachines
- VM image Type
- RDSH VM Configuration in Azure
- Domain and Network Properties
- Authentication to Windows Virtual Desktop
Up and downscale host pool resources – Breadth and Depth-first mode
For many Windows Virtual Desktop deployments in Azure, the virtual machine costs of the Windows Virtual Desktop session host VM represent the most significant portion of the total deployment cost. To reduce cost, the WVD Depth-first mode automatically fills up the first session host server maximum amount of users before spinning up a next one, and so on. The other option is to use it to shuts down and de-allocates RDSH server VMs during off-peak usage hours and then restarts them during peak usage hours. This can be a huge cost saver!
Breadth mode is the standard – default mode, which is based on Reserved Azure instances (IaaS). With Breadth mode, the users will spread across host pool collection.
Read more about this feature, and download the scripts/templates here.
Note: All these features will later be integrated into the Azure Portal, as part of the new Windows Virtual Desktop management console. Get a sneak preview here.
Some other recommendation and limitations:
- This scaling script is written to handle one host pool per instance of the scheduled task that is running the script.
- The scheduled tasks that runs scaling scripts must to be on a VM that is always on.
- Create a separate folder for each instance of the scaling script and its configuration.
- Accounts with MFA are not supported. It is recommended to use service principals to query access the Windows Virtual Desktop service and Azure.
- Azure’s SLA guarantee apply only to VMs in an availability set. Current document describes environment with single VM that is doing the scaling, this may not meet availability requirements.
You can find the rest of the document / implementation guidance here.
Microsoft Teams (and OneDrive) per-Machine is available for VDI!
Microsoft just released a new Per-Machine (Machine-Wide) version of Teams and will place the Teams application back to the Program Files directory. Currently, this per-machine version is only available for RDS, Citrix or VMware VDI machines – it basically detects the VDA software and RDS roles and fails to install otherwise. The Windows Virtual Desktop – Windows 10 Multi-User OS will follow soon as well as the video and audio offloading agent. Though it’s too important not to share, so that’s why I included the release in this article. Follow up here.
OneDrive Per-Machine is currently working as of today on Windows 10 Multi-User – the steps for doing this are listed here.
New Per-Machine installation locations are:
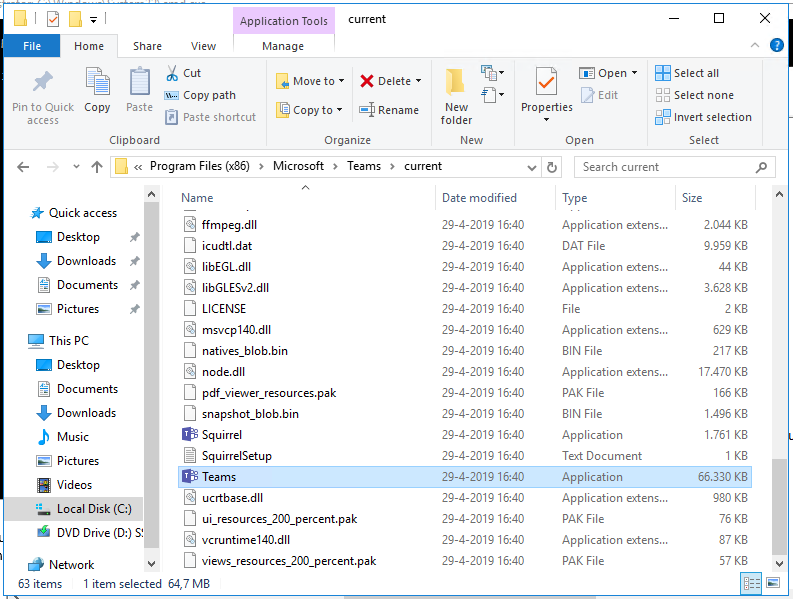
Teams installation folder location – %ProgramFiles(x86)%\Microsoft\Teams\
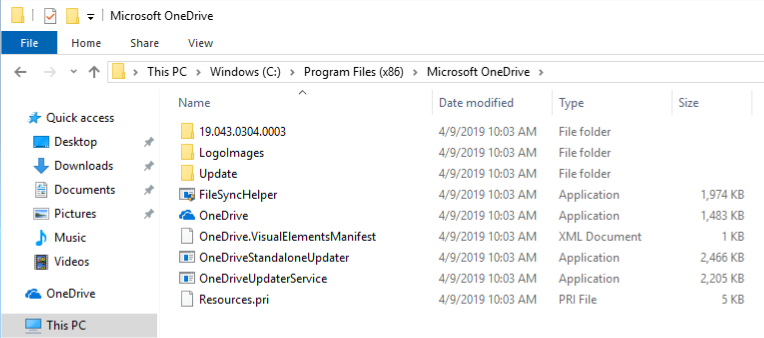
OneDrive installation folder location – %ProgramFiles(x86)%\Microsoft OneDrive\
OneDrive per-Machine is (also) available
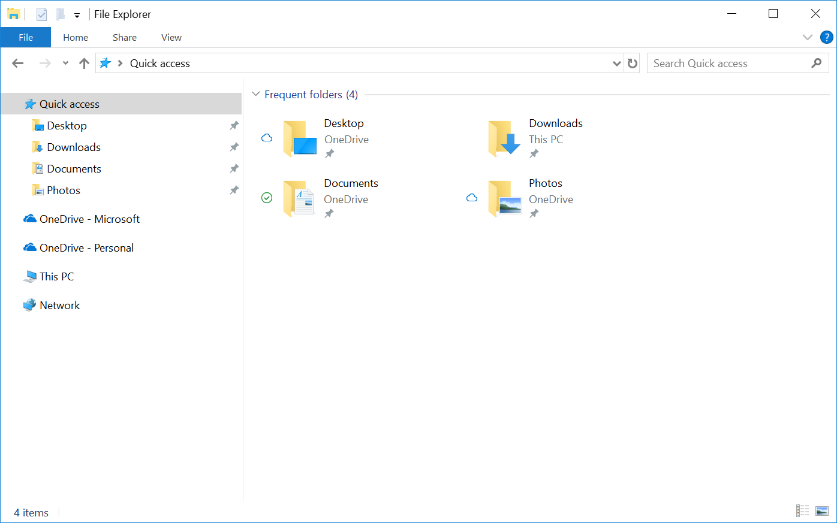
By default, the OneDrive sync client installs per user on Windows, meaning OneDrive.exe needs to be installed for each user account on the PC under the %localappdata% folder. With the new per-machine installation option, you can install OneDrive under the “Program Files (x86)” directory, meaning all profiles on the computer will use the same OneDrive.exe binary.
See here how to install OneDrive Per-Machine on Windows 10 Multi-User.
(Why using) OneDrive Known Folder Move together with WVD?
Recently, the OneDrive team added Known Folder Move functionality support to OneDrive, which is very useful to create the same end-user experience for our users on Windows Virtual Desktop as they would have on a Modern Desktop with all profile folders, such as My Documents, Pictures, Favorites, Desktop, etc. redirected to OneDrive. Also, with the use of OneDrive Files On-Demand, you’ll be able to save storage space from your profile folders due to the possibility to work with tiering for your hot and cold data.
While using Known Folder Move on different devices or VDI environments in conjunction with the same OneDrive account. You ensure to always have your Office 365 documents on the same location, everywhere you go! Even on your mobile device, without any notice
Activating Kown Folder Move is relatively easy. You can use the manual approach by opening the OneDrive client from the Start menu and click on Update Folders.

You can also use the automated approach
Enabling this policy sets the following registry keys:
[HKLM\SOFTWARE\Policies\Microsoft\OneDrive]"KFMSilentOptIn"="1111-2222-3333-4444"
(where “1111-2222-3333-4444” is the AzureAD Directory – tenant ID, which you can find in the Azure Portal – under the properties menu of your Azure AD tenant)
In the end, your profile folders will look like this, and are completely in sync with your OneDrive account.
New Azure Portal – Management Console
Windows Virtual Desktop (WVD) is just released GA. Currently, there is a separate management UX portal available to use as management GUI instead of using the designated PowerShell commands. This is a separate HTML portal that runs on Azure App Service using Azure AD as auth. mechanism.

Future looking. Both tasks will be simplified, and to give you a sneak preview – the following Azure Portal integration console will be part of the new native solution offering. It gives you the ability to manage and maintain desktop and RemoteApp assignments, assign groups to check and change virtual machine status more.
Note: The new WVD management Portal below will be released later next year.

(Now Available as Preview!) Future WVD Application Management – MSIX app attach (layering)
MSIX app attach is a newly announced sub-feature of MSIX, however now more efficient and optimized for virtual desktop technology due to the fact we use app streaming via MSIX, take a closer look at the bullet points below.
- Native format is MSIX (no re-packaging)
- Minimal performance impact
- MSIX Apps can be stored off the windows disk
- Remotely mount the apps to the VM on-demand
- Apps groups are assigned to users, and they’re available instantly on login
- Looks and feels local to the user and to windows
- For both Azure and On-Premises workloads (not specific to WVD only)
UPDATE 01.12.19: You can now kick the tires on this new MSX app attach! Learn here how to use it in your environment!
Learn more about app attach at this Microsoft Ignite breakout session here.
Maintain your WVD images with Azure Update Management
Your Windows Virtual Desktop master image can be managed by any already existing process, including Azure Update Management and System Center Configuration Manager. Azure Update management identifies missing system updates and orchestrates the installation of these updates across your Windows Virtual Desktop session hosts (and other infrastructure servers). You can sort of see it as the improved new Cloud platform service of Windows Update Services (WSUS).
Systems that are missing security updates can become targets of intrusions in your network and data. With simple out-of-the-box dashboards, you can quickly assess which servers need your immediate attention. With our update orchestration capabilities, you can manage the installation of updates across computer groups.

Windows Virtual Desktop and Azure Log Analytics
The main purpose of leveraging Public Cloud is not saving money. It’s around leveraging platform services to adopt as much as services to create the digital workspace for your business.
One of those platform services in Azure is LogAnalytics, the service to gather metric in your environment and bring them down to one single pane of glass dashboard. LogAnalytics gives you all information about sessions. This includes e.g. bandwidth and latency for every single user and session on your site. This can be relevant for troubleshooting or just monitoring purposes, and it doesn’t require any additional investments.
Note: This solution is offered as–is for community purpose and for testing. To get the full stack – including Power BI templates – and professional support contact sales@sepago.de
Search for Azure Monitor for RDS and Windows Virtual Desktop in the Marketplace

Walkthrough Guidance: How to enroll Windows Virtual Desktop on Azure
In the next steps, I’ll explain how you enroll Windows Virtual Desktop from scratch with a customer created Windows 10 Enterprise for Virtual Desktop (Multi-User) image among tips and tricks.
Pre-requisites for Windows Virtual Desktop
The following requirements are needed for the use of Windows Virtual Desktop on Azure.
- Entitled for licensing
- Azure Subscription
- Azure Active Directory setup
- Global Administrator rights
- Granting consent to the WVD service / Azure AD Enterprise Applications
- Azure AD Connect
- ADFS (optional for the best SSO end-user experience)
- Domain controller
- This AD must be in sync with Azure AD so users can be associated between the two
- VMs must domain-join this AD
- Optional: Azure AD Domain Services (in replacement for domain controller)
- Profile Containers network share (See here our recommended Azure Managed options)
- Network must route to a Windows Server Active…Directory (AD)
- Optional: Networking/on-prem connectivity – express route, VPN, etc.
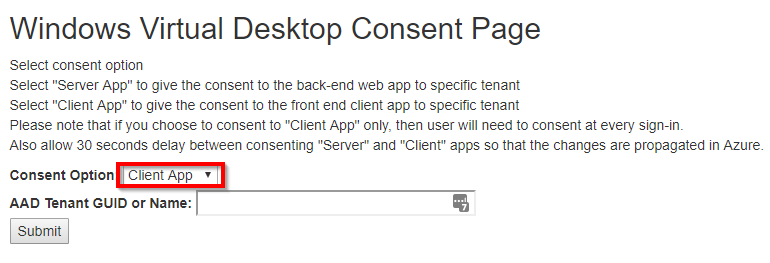
Pre-steps: Give Consent to your Azure AD tenant
Before you can create a WVD tenant, you must consent to have the WVD services access your Azure AD. The way WVD is designed requires explicit Azure AD consent. The process is much like how Azure requires you to enable non-standard resource providers before being able to use them.
Go to your Azure AD Properties in the Azure Portal, and copy your Directory ID.

After that, go to https://rdweb.wvd.microsoft.com/
Paste your Azure AD Directory ID in the text field and click on Submit
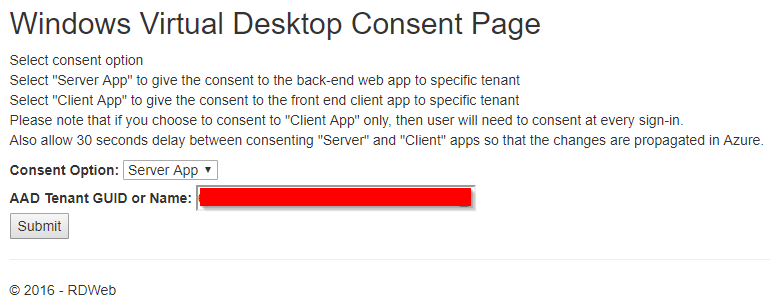
Logon with your Azure Global Administrator credentials of your Azure AD tenant

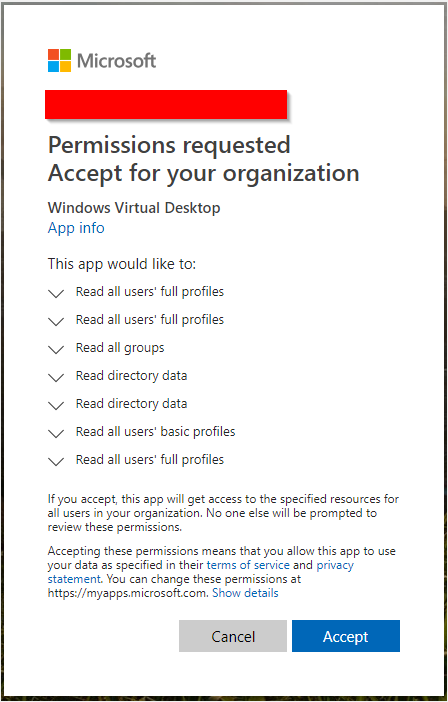
Accept the permissions request for your organization to finalize the principal creation process
And the application is created successfully

Repeat the same steps for the client app
https://rdweb.wvd.microsoft.com/
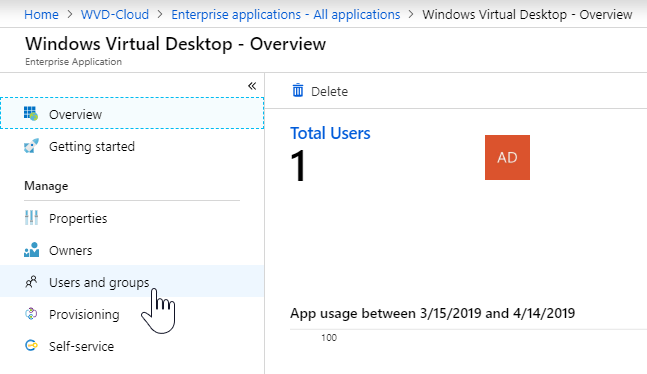
Assign privileges to create the Tenant
These steps are required to perform the next “create the WVD tenant” steps through PowerShell. Grant permissions for a user to create a Windows Virtual Desktop tenant.
Open Azure Active Directory
Click on Enterprise applications

Search for and then select Windows Virtual Desktop
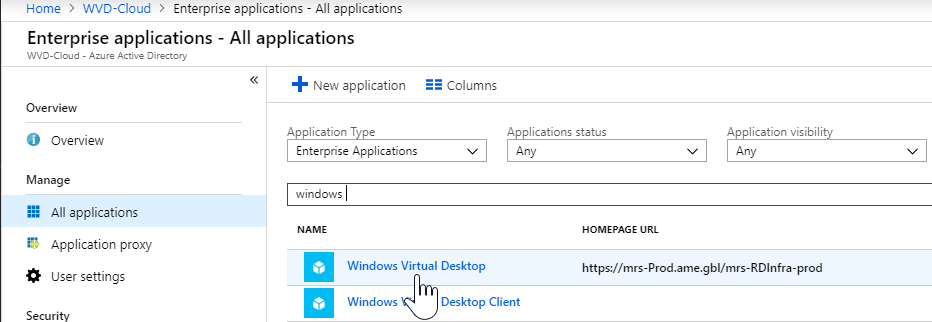
Select Users and Groups
Select Add User, select Users and Groups and search for a user that you want to give permissions to perform WVD tenant creation

Click onassign

Make sure that the TenantCreator role is assigned

Create the Windows Virtual Desktop tenant
First, we need to prepare your client to run the Windows Virtual Desktop PowerShell module.
To do so, please run the following PowerShellcommand
Note: don’t forget to start your PowerShell console with administrator privileges
Install-Module -Name Microsoft.RDInfra.RDPowerShell
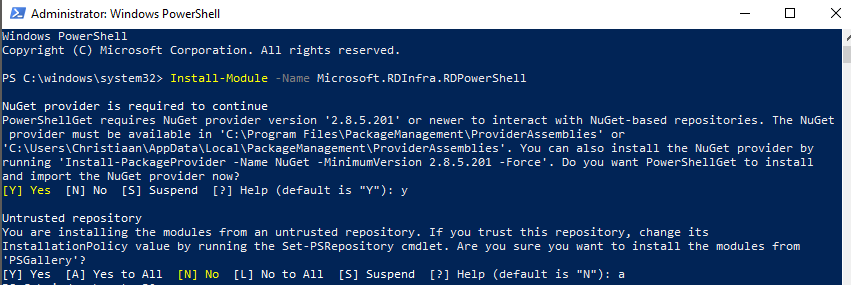
Also, make sure to import the module as well
Import-Module -Name Microsoft.RDInfra.RDPowerShell

Run the following command.
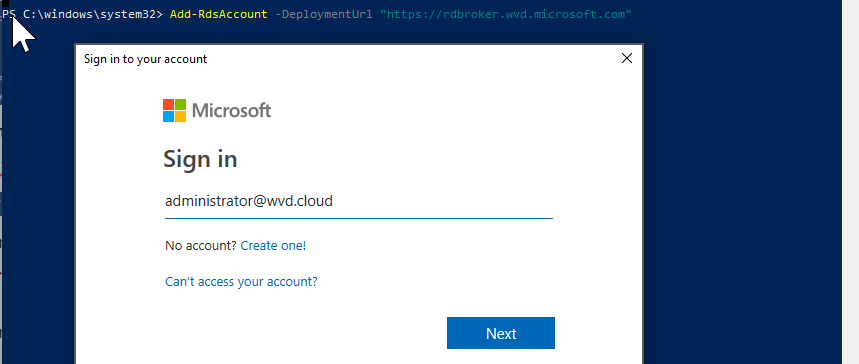
Add-RdsAccount -DeploymentUrl "https://rdbroker.wvd.microsoft.com"
Login with your TenantCreator administrator account
If everything goes as expected, you must see the following info in return

Now, run the following command below.
Name is your tenantname.
You can randomly create a tenant name, suggest using your organization name.
Use your AzureAD Directory ID in the AadTenantID section.
Where to find? Go to your Azure Portal > Azure Active Directory > Properties > Directory ID.
Secondly, use the Azure subscription ID of your Azure tenant where you need to deploy your virtual machines in for the AzureSubscriptionId section.
Where to find?
Azure Portal > search for Subscriptions, copy the subscription ID
New-RdsTenant -Name tenantname -AadTenantId 00000000-1111-2222-3333-444444444444 -AzureSubscriptionId 55555555-6666-7777-8888-999999999999
Make sure your tenant name returns successfully, like picture below.
Note: The name must be unique, make up a new name when it’s already in use!

Run the following command to create a host pool
Note: Create your own random hostpool name, such as WVD-Host-Pool01
New-RdsHostPool -TenantName TenantName -Name HostPoolName

Request the registration information token
Run the following command to request the registrationinformation to register our session host brokering agents to the broker.
New-RdsRegistrationInfo -TenantName TenantName -HostPoolName HostPoolName Select-Object -ExpandProperty Token c:\wvd.txt

Note: Copy the string to somewhere save – don’t lost the string, because we need them to register our master image / sessions to the broker.

Note: You can repeat the steps above for every host pool you want to create per Operating System. You can assign it later to the right host collection.
Assign WVD Desktop Application group
We can now assignusers to the host pool – to provide for instance the Windows 10 Multi User desktop.
Note: You can either assign Desktops or RemoteApps to one host pool, not both.
To assign a Desktop Group to a user, please run
Note: A Desktop Application Group stands for a full blown desktop.
Add-RdsAppGroupUser -TenantName TenantName -HostPoolName HostPoolName -AppGroupName “Desktop Application Group” -UserPrincipalName UPNuserAccount

Go to https://rdweb.wvd.microsoft.com/webclient/index.html and logon with your user account that your applied the desktop group to – to see if the Session Desktop icon is applied.
Note: The desktop does (obviously) not work yet. We first must create the master image and host pool!

Enroll the Windows 10 Multi-User + Office 365 ProPlus master image
There are different approaches to configure Windows Virtual Desktop. This can be either by Azure Virtual Machines or by using custom ARM scripts in conjunction with your own images, which can also be previous on-premises images that you can lift-and-shift with Azure Site Recovery to Azure.
Note: As part of the steps below, I’m showing al the manual steps of deploying a custom Windows 10 Multi-User (EVD) image in Azure and connect them to the Broker. This is the same procedure that you’ve to follow when you are using an existing image prior to preparation for the usage as part of Windows Virtual Desktop.
This is also to give you a complete and better technical understanding of the enrollment process. You could also use different ARM templates, or the pre-created images in the Windows Virtual Desktop Azure Marketplace – host pool deployment. Those are already enrolled with the RD Broker agent.
See here where you could select a prepared image. When you prefer that, please skip these steps and start directly here.

Go to Virtual Machine
Click on + Add

Click on Browse all images

Select Windows 10 Enterprise for Virtual Desktop + Office 365 ProPlus

Also, make sure to enroll the master VM with a standard disk when you want to use the VHD – URI as base image during the Host Pool enrollment.
Finish the setup – and start the enrollment of the VM
Note: Managed images are also supported. Use the following docs article as follow up.

Once the virtual machine is enrolled and up and running:
Connect through RDP to the machine – this can be internally or externally.
Note: If you haven’t got an ExpressRoute or Site2Site VPN – please use just in time access for an secure approach to open 3389 from the outside.
https://docs.microsoft.com/en-us/azure/security-center/security-center-just-in-time

Once you are logged on to your master image.
Download the Windows Virtual Desktop Agent – and install the WVD agent on the master VM
Note: Right-click the downloaded installer, select Properties, select Unblock, then select OK. This will allow your system to trust the installer.

Click on Next

Paste the token you received earlier while creating the host pool through PowerShell with command below.
Click Next
New-RdsRegistrationInfo -TenantName TenantName -HostPoolName WVD-Host-Pool01 | Select-Object -ExpandProperty Token c:\wvd.reg
Install the application – click install

The installation finished successfully

After this step, download the Windows Virtual Desktop Agent Bootloader and run the installer.
Note: Again – right-click the downloaded installer, select Properties, select Unblock, then select OK. This will allow your system to trust the installer
Click on Next

Click on Install

The installation finished successfully.

Download the Windows Virtual Desktop side-by-side stack and run the installer.
Note: Again – right-click the downloaded installer, select Properties, select Unblock, then select OK. This will allow your system to trust the installer
Click Next

Click Install

The setup will run some commands in a sperate DOS prompt. This can take up a while – 3 minutes…

The installation is finished.

Final Step – Download thisscript to activate the side-by-side stack.You can paste the script into a PowerShell window and run it. The outcome after running it most look similar like the exhibit below.

Now we can add our agents to the image, such as the FSLogix Apps Agent, plus your own agents and Win32 applications.
Install OneDrive Per-Machine
You can download the new per-machine version of OneDrive below:
https://go.microsoft.com/fwlink/?linkid=2083517
Make sure to re-install the application by using the following command.
OneDriveSetup.exe /allusers
Also, when running this on a Multi-User environment, this means that on that same session host, all the different user-profile – OneDrive versions will update simultaneously – which can get messy in terms of network throughput. This is also solved with the per-machine version.
The per-machine version will update itself by a service/account which injects itself during the installation. Therefore, you always need to run the installation as local administrator with UAC privileges.
Extra: Optimize the WVD VDI image for the best user density in Azure + Github PowerShell optimization script
This article helps you choose and prepare settings for Windows 10 Enterprise for Virtual Desktop (Multi-User) that should result in the best performance in a Virtualized Desktop Infrastructure (VDI) environment. All settings in this guide are recommendations to be considered and are in no way requirements.
As follow up to the official optimization for Window Virtual Desktop, you could use the latest new official Microsoft article around optimizing Windows 10, version 1803 (build 17134) VDIs that should result in the best performance in a Virtualized Desktop Infrastructure (VDI) environment. Most of the settings also apply for Windows 10 Enterprise for Virtual Desktops to gain in performance and user density!
Note: An automated optimization script that implements the optimizations discussed in this topic–as well as a GPO export file that you can import with LGPO.exe–is available at TheVDIGuys on GitHub.
Add FSLogix Profile Container for profile management
The article below will cover the complete installation of the Microsoft/FSLogix Profile Container—including all the steps that are needed, for the sake of the Windows Virtual Desktop environment – the process is the same.
If you are interested in the different options to store your Profile Container on Azure-Managed storage as well as the differences-make sure to check out the matrix below out of this Microsoft Docs article I wrote earlier.

If you’re ready to create your own FSLogix profile containers, get started with one of these tutorials:
- Getting started with FSLogix profile containers on Azure Files in Windows Virtual Desktop
- Create an FSLogix profile container for a host pool using Azure NetApp files
- The instructions in Deploy a two-node Storage Spaces Direct scale-out file server for UPD storage in Azure also apply when you use an FSLogix profile container instead of a user profile disk
Finalize the Windows 10 image
Note: Make sure to sysprep (shutdown) the image before you start with these steps below.
To wrap the Windows 10 Multi User (Windows 10 Enterprise for Virtual Desktops) image up and start the host pool enrollment process from the Azure Marketplace, we must delete the virtual machine to release the image. After that, we can use the URI file from our Azure storage blob environment to use as master image.
Note: As shared earlier. you could use Azure Managed Images as well as alternative. See here how to do that.
Before you delete the image – go to your Disks menu of the virtual machine and open on the name of the disk.

Save the location to your clipboard, we need this VHD URI path later.

Delete the Virtual Machine.
Note: The disk will stay behind in your storage account.

Enroll your Windows Virtual Desktop Host Pool
Now we come to the point where we can use our master image as baseline of our deployment. A host pool is a collection of session hosts (right now based on Windows 10 – Multi User, however Windows 7 and Server 2012 R2 and higher is supported as well). We can use them later to assign our Desktops and Published Apps to.
First, go to the Azure Marketplace
Search for Windows Virtual Desktop
Click on Create

Start the deployment with entering the your WVD tenant name.
We go for pooled, because we use a multi user environment, which is shared. Use personal when you want to assign a dedicated (persistent) virtual machine, such as Windows 10 single user to one specific user.
Note: Your tenant name is the one you entered in the command below, from the previous steps. Do not run this command again.
New-RdsTenant -Name cbrinkhoff -AadTenantId <DirectoryID> -AzureSubscriptionId <SubscriptionID>
Note: Enter a comma-separated list of users to be automatically assigned to the desktop app group for the host pool. For example, ‘user1@contoso.com,user2@contoso.com,etc.’.
Note: You can deploy your host pool in every Azure datacenter location, which supports Virtual Machines. For the best user experience, consider creating your environment near an Azure region containing a Windows Virtual Desktop cluster. Currently, the WVD control-plane is only available in Azure east US 2. After GA, more locations will be added. Also, see the traffic flow in the beginning of this article as follow up.
Click on Next

This prefix will be used in combination with the VM number to create the VM name. If using ‘WVD‘ as the prefix, VMs would be named ‘WVD-0′, ‘WVD-1′, etc. You should use a unique prefix to reduce name collisions in Active Directory and in Windows Virtual Desktop.
Click on Next

Now we come to the point where we define our master image, which we create earlier.
Paste the VHD – URI path
Note: You can use a pre-configured image as well, based on the Azure gallery.
Select your disk type – preferably SSD
Enter your normal (classic) Active Directory credentials for the computer account domain join
Select your Azure Virtual Network.
Note: You must select an existing virtual network that has access to the Active Directory. If you do not see it listed, you must re-start the deployment with the correct Azure location selected.
Click on Ok
Note: As shared earlier. you could use Azure Managed Images as well. See here how to do that.

Now we switch to the Azure AD – principal requirements.
First enter the name of the tenant group name associated with your Windows Virtual Desktop tenant. If you were not given one, leave it as ‘Default Tenant Group’.
Enter the name of your Windows Virtual Desktop tenant.
Select the type of account you would like to use to authenticate to Windows Virtual Desktop. This user must have ‘RDS Owner’ or ‘RDS Contributor’ permissions on the Windows Virtual Desktop tenant.
Note: You cannot enter a user account that requires MFA. If you intend to use MFA, consider creating a service principal for this purpose.

Check the summary, and click on Ok

Click on Create to start the host pool enrollment

When the enrollment is done – your machines will automatically

Assign Windows Virtual Desktop Remote Application group – RemoteApps
Optional steps: To assign a Remote AppGroup to a user, please run the command below.
Note: You cannot create a Remote Application Group on the same host pool when you already use it for your desktops. If you want to run RemoteApps and Desktops, you need to create 2 different host pools first and assign.
When you need another host pool for RemoteApps, please run all the previous command again, however, now with a different hostpool name.
Run the command below, with the new HostPoolName for RemoteApps
Add-RdsAppGroupUser -TenantName TenantName -HostPoolName "HostPool2" -AppGroupName "Remote Application Group" -UserPrincipalName UPNuserAccount
Also, save the registration token. You need them for the other host pool as well.
Note: Keep in mind that you must enroll 2 master images while using 2 host pools. You also need to enroll the host pool twice, one for the desktop host pool and one for the RemoteApps host pool
Please follow up for the other command here:
https://docs.microsoft.com/en-us/azure/virtual-desktop/manage-app-groups
Install the Windows Virtual Desktop Agent
To run your Windows Virtual Desktop – Full Desktops or RemoteApps directly from the client and/or start menu, you must install the WVD Client.
Download the WVD client below
http://aka.ms/wvd/clients/windows
Start the WVD Client – Desktop app

Subscribe to the feed using the URL
https://rdweb.wvd.microsoft.com
Click subscribe

Enter a user that has a desktop or apps applied.
Click on Next

And password.

Your RemoteApps and Desktops are ready to use!

And also, part of your Windows StartMenu!!

Use the HTML5 WebAccess portal
WVD can be accessed without a client or agent from a web browser, which can be beneficial when you need to do some work without having your own device with you.
To access the RDWeb portal, please go to.
https://rdweb.wvd.microsoft.com/webclient/index.html
Logon with your credentials.

Azure MFA can be added to this as well. Azure AD Conditional Access features are supported!
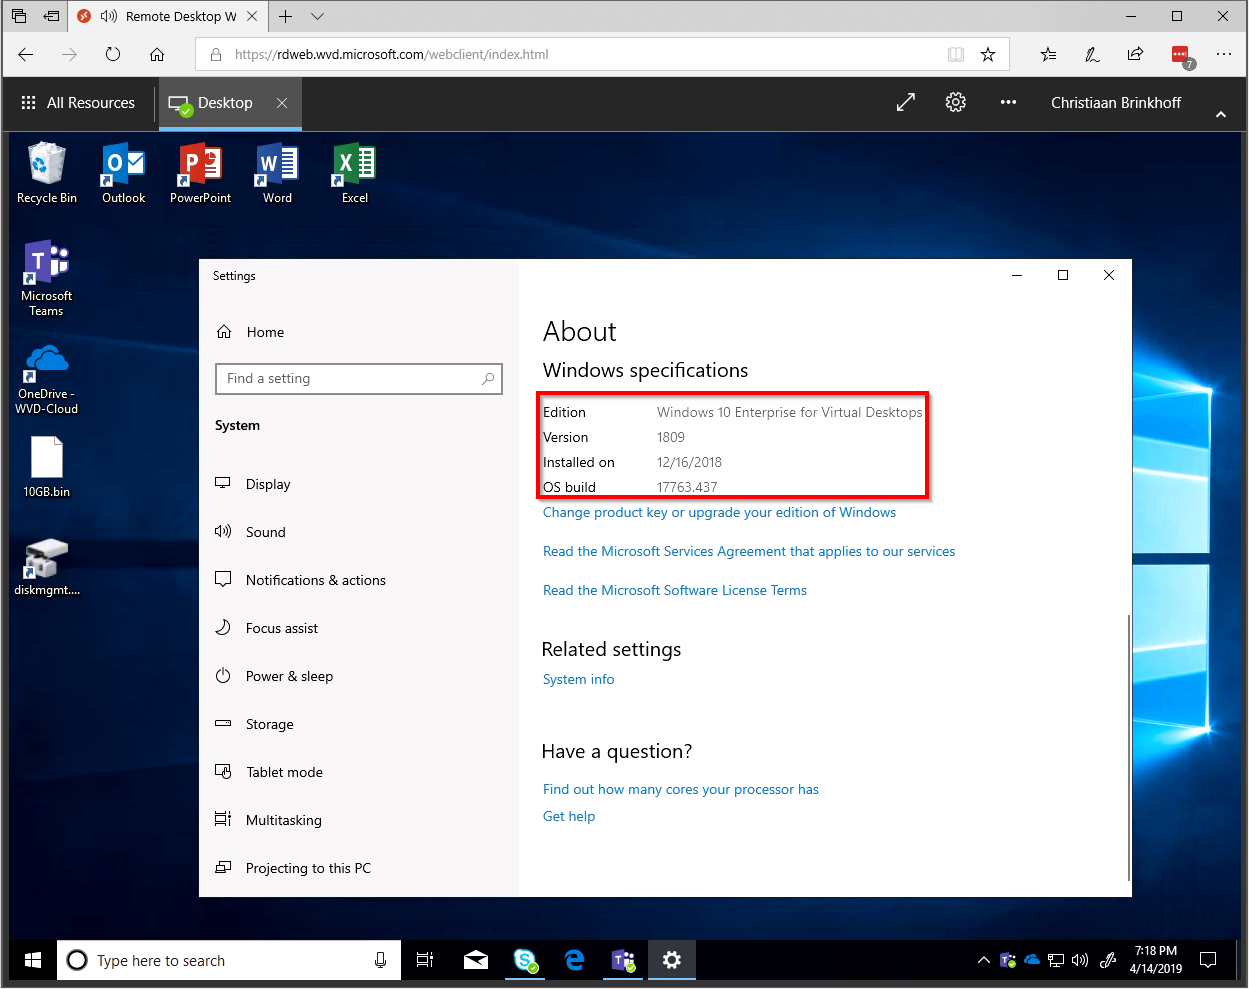
If you get access, you’ll see all your Desktops and RemoteApps

Accessing my Windows 10 Multi User…

We are inside our Windows 10 Multi User – Enterprise for Virtual Desktop session host, including OneDrive, Teams and Outlook – everything just works !
Some extra information regarding client supports; Windows Virtual Desktop supports the following clients as of today.
This URL goes directly to the official Microsoft download page to download the WVD client.
- Windows 10
- Windows 7
- Android
- Chromebook*
- Samsung DeX
- HTML5 Web client on Windows, macOS and Linux
- Which basically means every device is supported with a HTML5 browser installed.
See here a comprehensive troubleshooting overview and what to do when for feedback and support!
https://docs.microsoft.com/en-us/azure/virtual-desktop/troubleshoot-set-up-overview
Also, I wrote a previous article on Office 365 ProPlus and Office 2019 challenges. I encourage you to use that article in advance to this one.
Hope to see you back soon – and feel free to leave a comment if you’ve any questions.
Thank you,
Christiaan Brinkhoff


